How to Auto Fill Account and Policy Numbers?
Is there a way to set up 1Password so it can automatically enter one account number and one policy number on a website?
On the same web page there are also three fields for a credit card entry.
I haven't found a way to accommodate both entry field categories on the same web page with any of the 1Password options.
For example, while the credit card information gets filled, there is no entry option for the separate account and policy number.
I tried setting up a separate Login for the account number and policy number but it doesn't work.
Thanks for any tips.
1Password Version: Not Provided
Extension Version: Not Provided
OS Version: Not Provided
Sync Type: Not Provided
Comments
-
-
Hello @schwine1,
That's an interesting one you've brought us and we do have trouble there. The main page (https://www.economical.com/en/make-a-payment) that you pointed us to uses an IFrame for the credit card details and that IFrame comes from a completely different site (https://www3.moneris.com). I can create a Login item that will fill the Account Information fields but frustratingly also fills the card number field with the username and I can fill the Credit Card Information fields with a Credit Card item but it frustratingly fills the account number field with the expiry month.
I think I've found a workaround though, tell me what you think and if it helps.
- Load the page so all the fields are empty.
- Enter details into the three fields in the Account Information section and use the steps outlined on our page How to save a Login manually in your browser to save a Login item.
- Switch to the main 1Password windows and edit the newly created Login item.
- Delete the second website field that references https://www3.moneris.com and save this change.
Now if you reload the page in your browser do you find the following works at all for you?
- Fill using a Credit Card item. This will incorrectly fill the account number field but ignore that for now.
- Fill using the Login item you created from above. With the removal of the second website field this Login item should only try to fill the fields on the actual www.economical.com portion of the page and now no longer interfere with the card number field.
This will leave you with a page ready to have the payment amount entered with I've ignored for now as I assume the amount will vary whenever you use the page.
Do you get the same results if you try this and could it be a reasonable workaround? If you find it doesn't can you tell us a bit more about what version of 1Password you're running please and on what platform as maybe the results are different compared to my testing on my Mac.
0 -
I followed the instructions and it did not work for me.
When I try to auto-fill the first account information section with 1Password, it just enters my email address in the Account Number field.
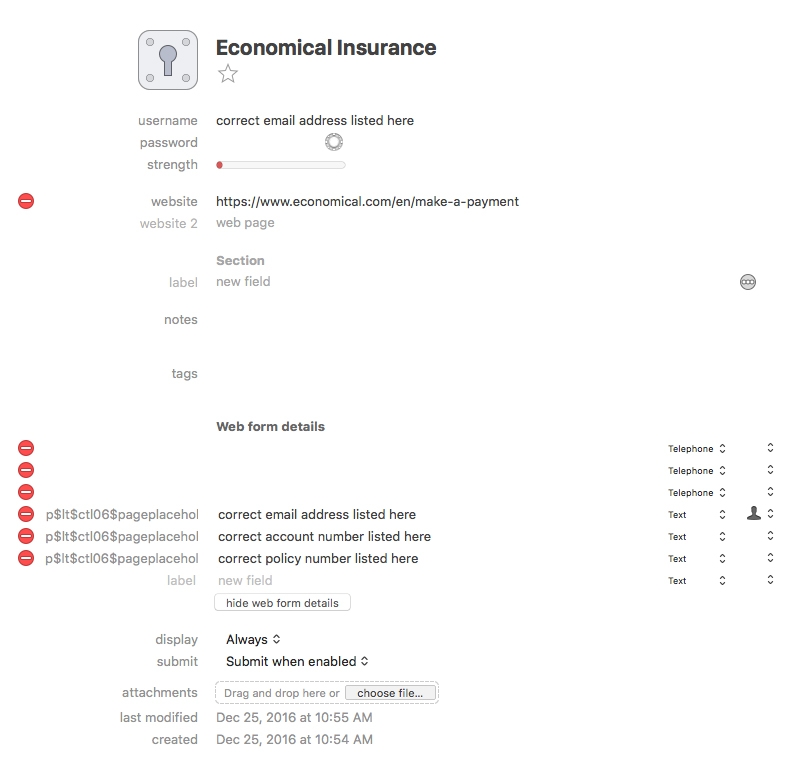
However, the Payment Information section works as before as a separate entry.I have included a screenshot of my 1Password web form details with this posting.
Instead of including my actual data, I just substituted a brief word description in the relevant entry fields.When analyzing this 1Password web form data, I see that my email address is listed twice.
Namely, once in the "username" entry field and once in the "web form details" section.The correct account and policy numbers are also listed in the "web form details section" (see the screenshot with this posting).
So then I tried the following experiment but that failed as well.I entered my account number in the 1Password "username" field, and my policy number in the 1Password "password" field.
The result was that my account number did enter into the correct account number field, but the policy number field remained blank.The email address field in the top Account Information section also remained blank as usual.
So it looks like only the first Account Number entry field in the Account Number section gets filled out with 1Password no matter how it gets configured.On the other hand, it sounds like you were able to get it to work so I may be doing something wrong.
In any case, I make sure only the main website URL is listed in the 1Password metadata: https://www.economical.com/en/make-a-payment 0
0 -
I am using 1Password 6.5.2 (652003) on a Mac Mini with OS X El Capitan (10.11.6).
I also changed the "submit" field from "Submit when enabled" to "Always submit."But that change didn't fix of of my negative results.
0 -
Hello @schwine1,
The image you posted, was that of a brand new Login item created by following the steps I suggested? The reason I ask is the presence of the three fields of type
telephoneat the top of the web form details. The test Login I created doesn't have these and if a Login item contains fields in the web form details that aren't on the page it alters the behaviour you'll see. I would expect at most to see the username field fill somewhere into the page and nothing else.Here's what I see when I create a empty Login item based on the page https://www.economical.com/en/make-a-payment

It's what I expected a new Login item saved in your copy of 1Password to look like too and assuming their server isn't sending us different pages (not unheard of) it would mean our Login items would need to have the same fields and field names for the three desired fields to fill.
I'd love to learn if this is a brand new Login item created inside of the browser. If it is, can you what your preferred browser is please and can you check and see what version of the 1Password extension you have installed. I'd expect it to be 4.6.2 but worth verifying :smile:
0 -
My browser of choice is Firefox (version 50.1.0) for Mac OS X and the 1Password Firefox browser add-on version is 4.6.2. I followed the original instructions again and my results are the same as noted above. I'm not sure why we are obtaining different results. For example, in Web Form Details the three Telephone listings appear once again as illustrated in the above screenshot.
0 -
Hi @schwine1,
Thank you for continuing to converse with me. I'm learning more about the page and I think I understand it much better now. I must have done something a bit differently last time but my memory is fuzzy enough that I can't remember what. I must have not reloaded the page sufficiently often or something like that.
So the reason my suggestion didn't work for you is that the page seems to be dynamically generating fields. So the fields of type telephone that puzzled me don't exist on the page when it first loads but do after you entered details. What this means is there are fields stored in the Login item that don't exist when you try to fill and so 1Password doesn't see it as exactly the same page and we need it to.
So I wonder if you will be willing to try something a little different.
- Open the main 1Password window and create a new Login from in here rather than in the browser.
- Leave the username and password fields empty but set the website field to https://www.economical.com/en/make-a-payment and title it accordingly.
- Save and then edit the Login item. It sounds weird but this is to force 1Password to create the web form details as we next want to alter it directly.
- Once in edit mode click the show web form details button and add three text fields titled,
accountNumber,policyNumber,emailand set the field value to the appropriate text. To give you an idea of what it should look like I will attach a screenshot below. - Save these changes.

(What it should look like before saving)
Now do you find this item will correctly fill the three fields where my attempts at being helpful before didn't?
0 -
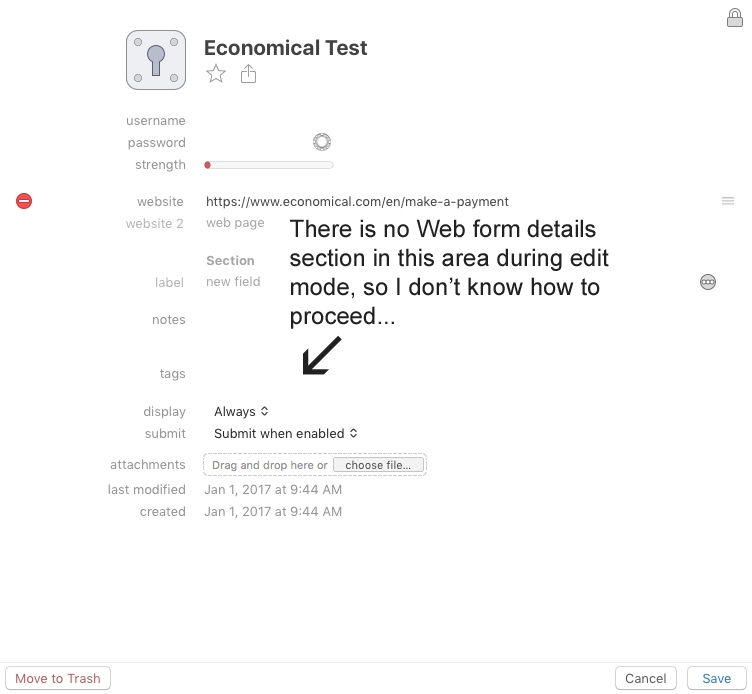
I get stuck on step #4 as I don't have an option that says: "Show web form details."
See the attached screenshot for an illustration. Not sure why I don't see this option. 0
0 -
Hello @schwine1,
Have you saved the item and then returned to edit mode? I realise it sounds like a daft step but when you first create a Login item it technically doesn't exist in full until it has been saved. Only after you have saved the initial item will the show web form details appear. Does that make any difference?
0 -
Yes, after completing step 2, I save the Login item. Then I click on the Edit option within the 1Password software. For some reason the Edit mode is not showing me the "Show web form details" option. It just looks like the screenshot uploaded in my previous forum reply above. These steps are straightforward so I don't think I'm making a mistake. I'm using Mac OS X El Capitan (version 10.11.6).
0 -
Greetings @schwine1,
Thank you for confirming and I apologise. You're absolutely correct meaning I did something that I wasn't even aware of when testing and writing up those steps. So this confusion and the delay is all on me - sorry. With a bit more testing I think I've found what it is. When I created my test item I used the tab key to move focus down to the website field and if you tab over the username and password fields then there is a show web form details button but if you click on the website field directly there isn't. That's some really dumb behaviour.
So here is an alternative set of steps that should work.
- Create a new Login item and set the title and website field as before but also set the username to your account number and then save.
- Edit the Login item. You should now have the show web form details button (really sorry about that).
- Your account number will already be present in a field titled
username. Change the field title toaccountNumber. - Add two text fields titled,
policyNumberandemailand set the field's value to the appropriate text.
I've learnt about a certain idiosyncrasy in 1Password for Mac as well from all of this. Do you find these amended steps work better?
ref: OPM-4700
0 -
The new procedure works but with one small change.
I enter the credit card information first and the account information second.If I enter the credit card information second, it will replace the numbers in the top Account Number field with the two month digits of the credit card expiry date. I'm not sure why it does that, but it doesn't do that if I enter the credit card information first and the account information second. All data is correct and in the right entry boxes when the order of data entry is reversed with 1Password.
In the Credit Cards section of 1Password, the expiry date listed in this format: xx/xxxx (month and year).
But when entering the expiry date in Edit mode the format looks like this: xxxx-xx (year and month).That probably has nothing to do with this quirk or bug in this online form, though.
The cause of that entry error may be the online form itself instead of 1Password, I'm not too sure.Anyway, reversing the order works so that's great.
Thanks for the help.0

